Chromecast / Google TV
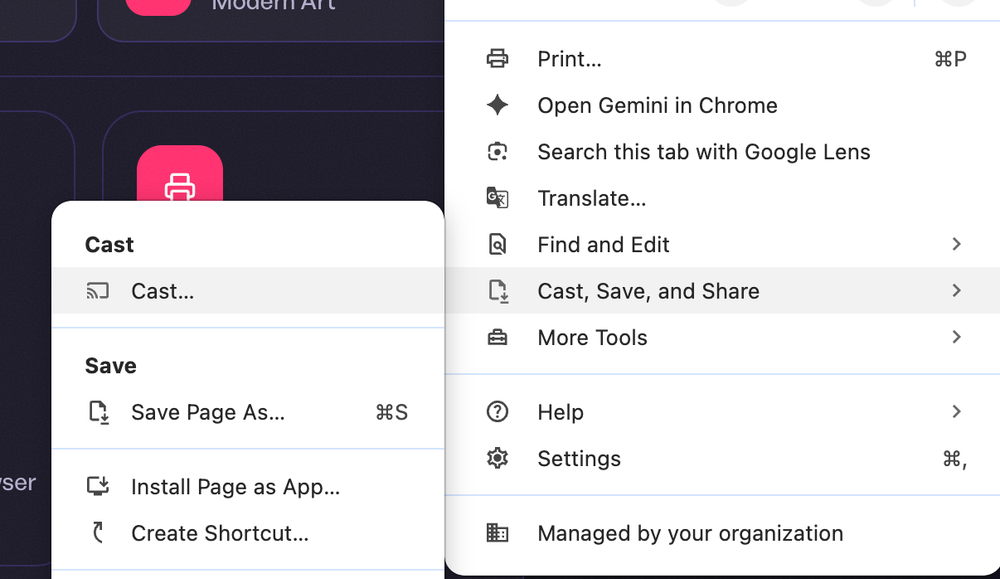
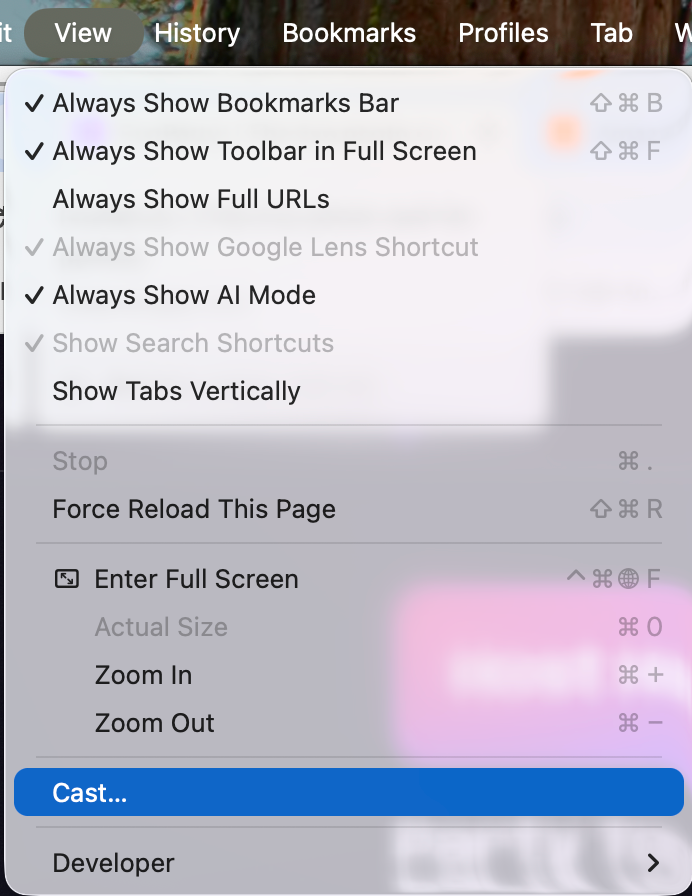
On a laptop, open the TV slideshow in Chrome. Open Chrome’s menu, choose Cast, select the TV, and cast the tab. Keep the laptop and casting device on the same Wi-Fi.
Start with the display guide, check the common fixes, and find quick answers for guest uploads, host controls, privacy, and the album afterward.
The biggest setup question
Use the path that fits your equipment. Chromecast or Google TV is usually the easiest; HDMI is the best fallback when venue Wi-Fi makes casting difficult.
Open and test the TV slideshow on a laptop or desktop, then connect it to the TV with HDMI or cast the Chrome tab. This is especially important after choosing a theme: check the actual slideshow on the big screen so you can see how the finished look will feel at the party. A computer also makes full-screen viewing and troubleshooting much easier than running the display from a phone.
Google Chrome
Use Chrome on a laptop or desktop. Keep the Host Hub open in its original tab. The TV slideshow opens separately.
Open the big-screen view from the Host Hub. Leave that slideshow tab open while you connect it to the TV.
Use either route shown below. The exact menu location can vary slightly by Chrome version.


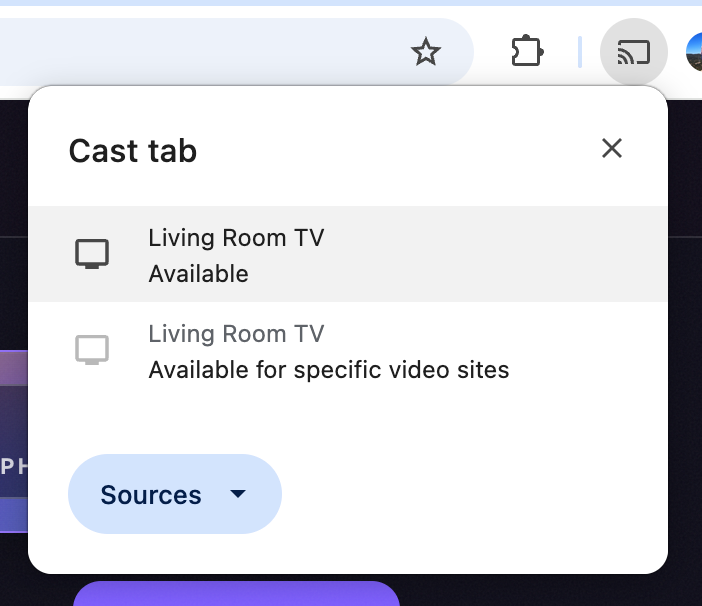
Select the available TV in the Cast tab section. Do not choose the entry marked “Available for specific video sites.”

Chrome casts just this slideshow tab, not your whole computer screen.
You can continue using the rest of your browser and computer normally. Just leave the slideshow tab open while the party is running.
Once the TV is connected, full-screen the slideshow tab so the photos fill the display.
The computer and TV usually need to be on the same Wi-Fi.
If the TV never appears, use an HDMI cable as the dependable backup.
On a laptop, open the TV slideshow in Chrome. Open Chrome’s menu, choose Cast, select the TV, and cast the tab. Keep the laptop and casting device on the same Wi-Fi.
Open funpartyapp.com in the TV browser and enter the event code shown in the Host Hub. Use the TV browser’s full-screen option if it has one.
Connect a laptop to the TV, select the matching HDMI input, open the TV slideshow, and make the browser full screen. Live uploads still need internet.
Open the slideshow on a Mac or iPhone, then choose Screen Mirroring from Control Center and select the Apple TV. Both devices usually need the same Wi-Fi.
Quick troubleshooting
Confirm that the laptop or phone and Chromecast, Google TV, or Apple TV are on the same Wi-Fi. Venue guest networks sometimes block devices from finding each other; use HDMI if that happens.
Use the TV remote to select the HDMI input that matches the cable. If you use an adapter, reconnect it at both ends and confirm the laptop recognizes the second display.
Check that the display device still has internet. If the event uses Review first, approve pending photos in the Host Hub. Then reload the slideshow if it has stopped updating.
On Windows, press F11. On a Mac, press Control + Command + F or use the green window button. A TV browser may have a full-screen or expand option in its menu.
Move the casting device closer to the Wi-Fi access point, close unrelated browser tabs, and keep an HDMI cable and adapter available as the dependable backup.
Test the exact TV, network, browser, cable or casting device, and phone you expect to use. Keep an HDMI backup nearby when the venue network is unfamiliar.
Common questions
No. Guests scan the QR code or open the guest link, add a display name, complete the event acknowledgements, and upload from their phone browser.
If the event uses Review first, the photo is waiting in Pending Photos until the host approves it. A new upload may also need a moment to finish processing. Hidden photos stay off the shared gallery and TV wall.
Turn up the TV or phone brightness, make the QR larger or move the printed sign closer, and keep glare off the screen. You can also copy the guest link from the Host Hub and send it in the group chat.
No. Guests can use venue Wi-Fi or cellular data. The slideshow and uploads both need working internet, while casting or AirPlay usually requires the display device and the casting device to share a network.
Yes. Turn guest uploads off in the Host Hub. The upload QR disappears from the TV and new uploads are blocked; an upload already in progress may finish cleanly.
Use Auto-approval for a trusted crowd and the quickest live reaction. Use Review first when every photo should wait for host approval before appearing. You can still hide or delete a photo after it goes live.
Hiding removes the photo from the shared gallery and TV wall without removing the stored file. Deleting removes it permanently, so use delete only when you are sure.
Yes. Open Theme Studio from the Host Hub, preview another look, and set it for the event. The guest link, QR code, and TV code do not change.
Select the event in the Host Hub and open the Share section. The event code is shown with the guest QR, guest link, TV slideshow button, and printable table sign.
Yes, and you should. Use the exact phone, internet connection, TV, cable or casting path, approval mode, and QR placement you expect to use. Add a few sample photos so the wall is not empty when guests arrive.
Event pages are unlisted and blocked from search engines, but anyone with the guest link can open the event while it is available. The TV code opens the approved-photo slideshow, so share links and codes only with intended guests or display operators.
Guests can see photos that the host has approved or allowed through Auto-approval. Pending and hidden photos do not appear in the shared gallery or on the TV wall.
Open the event in the Host Hub and choose Download Event Album. The download includes approved and hidden album photos; pending photos need host approval first. Keep a separate backup of memories you want to preserve.
Events do not currently expire automatically. Photos remain available until the host deletes a photo or the event, but downloading a separate backup is still the safest choice.
Tell us what you were trying to do, which device or TV you used, and what appeared on the screen.